Click here -> to go to the Table
of Contents
Printer Setups
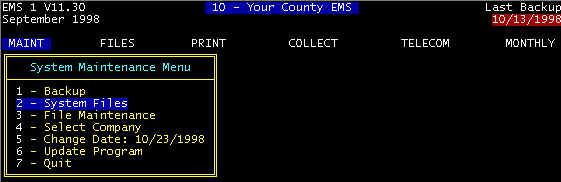
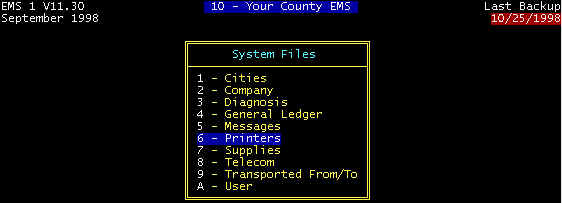
Menu Path: MAINT/System Files/Printers
The PRINTER file allows
multiple printers to be attached to a single computer or workstation, either directly or
indirectly via a network. Also, as multiple configurations of a single printer
dependent upon the form and/or report being printed. Additionally, the physical
characteristics for the printer can be matched to the forms/reports being printed--for
example, the paper-load position, margins, etc. can be matched to the printout such that
manual adjustment is not required.
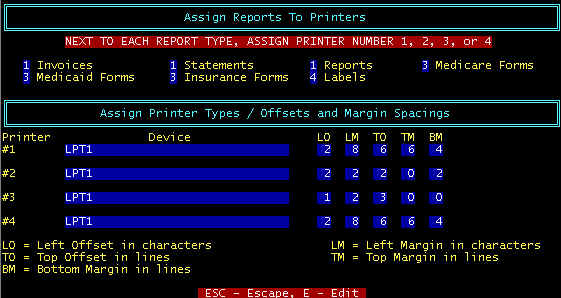
As shown, three logical printers and a label printer can be assigned to
the printed reports.
Printers are assigned an output
port such as LPT1, LPT2, etc., and this is due to the the of interface board inside the
computer to which the external printer is connected, plus some other software
configuration program is set, and this is standard procedure for all type computer
programs.
Printer assignments via the printer screen serves several
purposes:
tto set
margins and offsets in order to position the printed data to compensate for both the
automatic load position and feeding mechanisms of specific printers, as well as the
different positioning required for the different forms and paper used, without the need
for manual adjustment of paper position after the auto paper-load ; tto route certain printed reports
to one printer, certain reports to the second printer, and certain reports to the third
printer. If more that one printer is used, this allows different types of forms, paper,
etc. to be in place without having to change paper each time a different paper/form is
printed; tbut most
often, to allow different print positions for data using the same printer - the example
above uses a single printer (LPT1), but different print positions for forms as for
reports.
In the printer screen above, printer #1 is assigned to the following
reports: Invoices, statements, and reports. Printer #2 is assigned to Medicare 1491,
Medicare 1500, and Medicaid.
Printer device listed on the screen as Device, usually refers to
the computer device (or disk file - see below) to which the program routes the data to be
printed.
Redirecting the printed output through the network to a printed
connected to another computer on the network is done by assigning this output to device
LPT3. Assigning and using shared network printers should be done reservedly, with problem
areas described later. Printer device assignment is done in two places:
Œ
The network printer setup software may be difficult and
complicated to access, and this is typically done by the system installer. For example,
the network printer may be defined as LPT3. Thus if a work station assigned a printer (via
the printer screen shown above) to LPT3, then reports assigned to this printer (physically
located remotely from the workstation) would be routed (spooled) to the network printer
via the network software.
Printer device assignment must also be done at each workstation
via each printer screen, but using the same device (LPT3 for example) as the network
software as described immediately above.
There are both advantages and disadvantages of sharing printers via the
network, and the disadvantages usually outweigh the advantages. First the advantages.
Obviously fewer printers are required. Additionally, a very high speed (more expensive)
printer can be used for possibly faster operation.
Now the disadvantages:
t
the person selecting the printed output is not located at the printer to observe
printer jams, out of paper, etc.
t
printing
does not commence until the file has completed transmission via the network to the network
computer to which the network printer is connected.
t
in
case of printer "busy" conflicts, the requested printed outputs are put in a
network printer "queue", and printed when the printer finishes reports in the
order of this "queue". In case of a printer paper jam, forcing the printer to go
busy, as well as requiring that the report be re-printed, a network application program
must be run to free the condition.
If a file name (only) is specified
under the device heading for printer #3, for example file name TEST.PRN, the data intended
for printing on printer #3 will be stored on the current disk drive, and in the current
directory/subdirectory as TEST.PRN (in most cases C:\EMS\TEST.PRN). If a drive, path, and
file name (C;\TEST\TEST.PRN, for example) are entered under the device heading for printer
#3, reports directed to printer # 3 will be written to the specified drive and directory
as file TEST.PRN , and in this example located on the C: hard drive, subdirectory TEST
(note that the system must have a C-Drive, as well as a TEST subdirectory). The file that
is stored with file name TEST.PRN is in a "text" format that can be read into
most word processing and data base programs for whatever reason. Once read by the word
processor, editing, formatting, etc. can be done for whatever reason.
Note that TEST.PRN is overwritten every time a printout is directed to
printer #3, and thus, immediately after recording a printout as TEST.PRN, go into the
subdirectory and rename TEST.PRN to TEST2.PRN (for example), otherwise the file will be
overwritten, the next time a printed output is directed to printer #3.
Most modern printers have an automatic
paper-load feature, but different manufacturer's printers may end up with the paper in
different positions; this can even vary side-to-side for identical printers, depending
upon the tractor pin-wheel lock-down positions. It is desirable to automatically load
printer paper and leave in the auto-load position without the need for further manual
adjustment. Adjusting the print position to compensate for auto-load paper positions is
accomplished via "Offset and Margin Spacings" parameters as described
below. Note that the effect of these print positioning parameters is difficult to describe
and understand, thus an overview of horizontal (across the width) positioning and vertical
(up and down) positioning is presented before parameter details are described. For the
discussions below, note that there are 80 print positions for each line, and a maximum of
66 lines per page.
There are certain parameters
that are used to position the printed information on the statements, invoices, reports,
and forms, as defined below; positioning of printed information on forms is most critical.
There are two parameters that
determine the physical limitations of the printer, and these are the offsets. For example,
a particular printer may not be physically able to print any nearer the left edge of the
paper than a blank space or 2 characters, and thus LO=2 for this printer. Similarly, this
printer may not physically be able to print any nearer to the top edge of the paper than
three blank lines, and thus TO=3. Note that laser printers can printer nearer the edges in
GRAPHICS MODE, but we are not interested in graphics mode. The way to
determine TO and LO is to get to the root directory of your hard drive and from your
keyboard, type:
COPY<space>
AUTOEXEC.BAT<space>LPT1<enter>
This will transfer a file to
the printer in non-graphics mode. Measure the number of blank character spaces between the
first character printed to the left edge of the paper and this number is the left offset
– LO. Similarly, measure the number of blank lines between the first printed line and
the top edge of the paper, and this number is the top offset – TO. You have measured
the physical margin limitations of your particular printer. After entering these offsets,
zero-in with the positioning with the top and left margins TM and LM, except for forms,
and these two settings are always 0 (zero) for forms, but for other reports cannot be less
than the offsets, as described below.
LM - this is the desired
left margin. Increasing by one moves the printed area to the RIGHT one character
position. Zero for forms, for reports, minimum value of the LO value
LO -- this is the computed left offset . Increasing by one
moves the printed area to the LEFT one character position.
TM -- this is the desired top margin. Increasing by one
moves the printed area DOWN one line, thus having the effect of REDUCING the
number of printed lines on a page by one, and at the same time moving the line that was
previously at the bottom of page one to the top of page two. TM=0 for forms, minimum value
of TO for all reports
TO
-- this is
the computed top offset. Increasing by one moves the printed area UP one
line, thus having the effect of INCREASING the number of printed lines on a page by
one, and at the same time moving the line that was previously at the top of page two to
the bottom of page one.
BM -- this is the desired bottom margin. Increasing by one
increases the blank area at the bottom of the page by one line, thus having the effect of REDUCING
the number of printed lines on a page by one, and at the same time moving the line that
was previously at the bottom of page one to the top of page two. The minimum value is the
number of blank lines that the printer cannot physically print.
Forms especially require printing in exact locations,
and settings for certain printers are shown below – note that for forms, the top and
bottom margins (TM and BM) are always set to 0. Position the printout by changing the
other parameters: offsets LO and TO, and LM. The offsets are the physical limitations of
the printers. Some printers can print on a larger area of the printable space. For
example, some printers are capable of printing three lines down from the top edge of the
paper, whereas other printers can print only as high as five lines down from the top edge.
Similarly with the Left margin. Thus these offsets are used to adjust the print to your
specific printer. To test the effects of changing TO and LO, go to print forms, print test
pattern. Adjust TO and LO for the best fit of the printed test pattern to the form.
Parameters for several popular printers is tabulated in figure 1.